Airflow DAGs Explained: Structure, Scheduling, and Dependencies
Master Airflow DAGs -- learn the anatomy of a DAG file, scheduling with cron and presets, defining task dependencies, fan-out patterns, and task lifecycle states.
What you'll learn
- ✓The anatomy of a DAG file: imports, default_args, context manager
- ✓How scheduling works with presets and cron expressions
- ✓Defining task dependencies with the >> operator and methods
- ✓Fan-out, fan-in, and conditional patterns
- ✓Task lifecycle states from creation to completion
Prerequisites
- •Basic Python knowledge
- •Airflow installed and running (see Installation & Setup)
- •Understanding of what Airflow is
What Is a DAG, Really?
If you have read the introductory article, you know that DAG stands for Directed Acyclic Graph. But knowing the acronym and truly understanding the concept are two different things. Let us go deeper.
Think about your morning routine. You wake up, brush your teeth, take a shower, get dressed, eat breakfast, and leave for work. Some of these steps have a strict order — you cannot get dressed before you shower (well, you can, but it defeats the purpose). Other steps are independent — you could eat breakfast before or after getting dressed. And critically, none of these steps loop back on themselves — you do not brush your teeth, then go back to sleep, then wake up again.
That is a DAG. Each step is a “node,” the ordering requirements are “directed edges,” and the no-looping rule is the “acyclic” property.
In Airflow, a DAG is a Python file that describes this kind of workflow for data operations. Instead of “brush teeth” and “take shower,” your nodes might be “pull data from API,” “clean the data,” and “load into the warehouse.” The DAG tells Airflow three things: what tasks exist, what order they must run in, and when to start the whole process.
The “acyclic” constraint is not just a mathematical nicety — it is a practical necessity. If Task A depends on Task B, and Task B depends on Task A, Airflow would be stuck in an infinite loop, unable to start either one. By forbidding cycles, Airflow guarantees that every workflow has a clear starting point and a clear finish line. There is always at least one task with no dependencies (the entry point) and at least one task with no downstream tasks (the exit point).
Anatomy of a DAG File
Every DAG file follows a consistent five-part structure. Understanding each part will make it much easier to write your own DAGs and read other people’s code. Let us walk through each section before looking at the complete code.
Part 1: Imports. Like any Python file, you start by importing the modules you need. At minimum, you need datetime (to specify when the DAG should start) and the DAG class from Airflow. Then you import whatever operators your tasks will use.
Part 2: Default arguments. These are settings that apply to every task in the DAG — things like retry behavior, email notifications, and ownership. You define them once in a dictionary, and every task inherits them. Any task can override a default if it needs different behavior.
Part 3: DAG definition. This is where you create the DAG object itself, giving it a name, a schedule, a start date, and other configuration. The with DAG(...) as dag: pattern is a Python context manager that automatically associates every task defined inside it with this DAG.
Part 4: Task definitions. Inside the DAG context, you create your tasks. Each task is an instance of an operator (like PythonOperator for running Python code or BashOperator for running shell commands).
Part 5: Dependencies. Finally, you wire the tasks together, specifying which tasks depend on which others.
Here is a complete example with all five parts:
from datetime import datetime, timedelta
from airflow import DAG
from airflow.operators.python import PythonOperator
from airflow.operators.bash import BashOperator

default_args = {
    "owner": "data-team",
    "retries": 2,
    "retry_delay": timedelta(minutes=5),
    "email_on_failure": True,
    "email": ["alerts@company.com"],
}

with DAG(
    dag_id="my_pipeline",
    default_args=default_args,
    description="A pipeline that processes daily sales data",
    start_date=datetime(2026, 1, 1),
    schedule="@daily",
    catchup=False,
    tags=["sales", "etl"],
) as dag:

    extract = BashOperator(
        task_id="extract",
        bash_command="echo 'Extracting data'",
    )

    transform = PythonOperator(
        task_id="transform",
        python_callable=lambda: print("Transforming"),
    )

    load = BashOperator(
        task_id="load",
        bash_command="echo 'Loading to warehouse'",
    )

    extract >> transform >> load
Now let us look at the most important parts in detail.
Default Arguments: Setting Behavior for All Tasks
The default_args dictionary saves you from repeating the same settings on every task. If you have 15 tasks in a DAG and they all need 3 retries with a 5-minute delay, you set it once in default_args instead of writing it 15 times.
Here are the most commonly used default arguments and why they matter:
owner — A string identifying who is responsible for this DAG. This shows up in the UI and can be used to filter DAGs. In a team setting, this helps people know who to contact when a DAG fails.
retries and retry_delay — How many times Airflow should retry a failed task before giving up, and how long to wait between retries. In practice, many failures are transient — an API timeout, a brief network blip, a temporary database lock. Setting retries to 2 or 3 handles these gracefully without human intervention. The retry delay gives the external system time to recover before the next attempt.
email_on_failure and email — Whether to send an email notification when a task fails, and who to send it to. This is your first line of defense against silent failures. Without it, a pipeline could fail at 3 AM and nobody would know until someone checks the dashboard the next morning.
depends_on_past — This one is subtle but important. When set to True, a task will only run if the same task in the previous DAG run succeeded. For example, if your daily “load” task failed yesterday, today’s “load” task will not run even if today’s “extract” and “transform” succeeded. This is useful when tasks are not idempotent — when running them out of order could cause data quality issues.
execution_timeout — A safety net that kills a task if it runs longer than expected. Without this, a hung task can occupy a worker slot indefinitely. If your extraction normally takes 20 minutes, setting a timeout of 2 hours gives plenty of buffer while still catching runaway processes.
DAG Parameters: Controlling When and How Your Pipeline Runs
The DAG object itself accepts many parameters. Let us focus on the ones you will use in virtually every DAG.
dag_id
This is the unique name of your DAG. It must be unique across your entire Airflow instance — if two DAG files define a DAG with the same ID, Airflow will only see one of them. Use descriptive snake_case names like daily_sales_etl or weekly_report_generation, not generic names like pipeline_1.
start_date
The start_date tells Airflow the earliest date it should create a DAG run for. This is a logical date, not the date you deploy the DAG.
To understand why this matters, imagine you create a daily DAG on March 15th with start_date=datetime(2026, 3, 1). If catchup=True (the default), Airflow will look at the calendar and create DAG runs for March 1st, March 2nd, March 3rd, all the way up to March 14th. These “backfill” runs will process historical data for each of those dates.
A critical gotcha: never set start_date to datetime.now() or any dynamic value. The Scheduler re-parses your DAG file every 30 seconds. If start_date changes on every parse, Airflow gets confused about which runs have been created and which have not. Always use a fixed, hardcoded date.
In practice, most teams set start_date to the first day they want data processed, or to a recent date if they do not need historical backfilling.
schedule
The schedule parameter determines how often Airflow creates new DAG runs. You have three options for expressing the schedule.
Preset strings are the simplest. Airflow provides human-readable shorthands for common intervals:
| Preset | Meaning |
|---|---|
None | No automatic schedule — manual trigger only |
@once | Run exactly once |
@hourly | Every hour at minute 0 |
@daily | Every day at midnight UTC |
@weekly | Every Sunday at midnight |
@monthly | First day of every month at midnight |
Cron expressions give you precise control over timing. If you have used cron before, the syntax is identical. If you have not, here is how it works. A cron expression has five fields: minute, hour, day of month, month, and day of week. Each field can be a specific number, a wildcard (* meaning “every”), or a pattern.
30 6 * * *      -- Daily at 6:30 AM
0 */2 * * *     -- Every 2 hours at minute 0
0 9 * * 1-5     -- Weekdays at 9:00 AM
*/15 * * * *    -- Every 15 minutes
Timedelta objects let you express intervals as Python durations: schedule=timedelta(hours=2) runs every 2 hours. This is less common because cron expressions are more flexible, but it is occasionally convenient.
catchup
This parameter controls whether Airflow should create DAG runs for past intervals that were “missed.” The default is True, which catches many beginners off guard.
Here is the scenario: you create a daily DAG with start_date=datetime(2026, 1, 1) and deploy it on January 10th. With catchup=True, Airflow immediately creates 9 DAG runs (for January 1st through 9th) and starts processing them all. If your DAG interacts with external systems, this sudden burst of 9 simultaneous pipeline runs can overwhelm APIs, databases, or your own infrastructure.
Set catchup=False unless you specifically need to backfill historical data. When you do need a backfill, you can trigger it explicitly through the CLI, which gives you control over the pace and scope.
max_active_runs
This limits how many runs of this DAG can execute simultaneously. Setting it to 1 means only one run can be active at a time — if the current run is still going when the next scheduled interval arrives, the new run waits.
This is essential for DAGs that are not idempotent. If your DAG writes data to a table without doing an “upsert” or “delete-then-insert,” having two runs write simultaneously could create duplicates. Setting max_active_runs=1 prevents this by serializing runs.
In practice, max_active_runs=1 combined with catchup=False is the safest default for most production DAGs.
Understanding Execution Timing
This is one of the most confusing aspects of Airflow for beginners, so let us take the time to understand it properly.
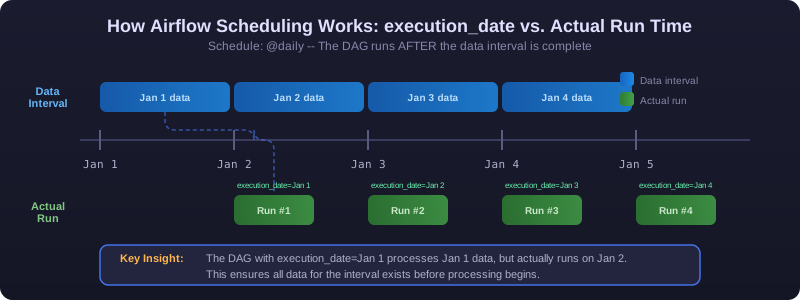
A DAG with schedule="@daily" and an execution date of January 15th does not run on January 15th. It runs at the end of January 15th — which is midnight on January 16th. The execution date represents the start of the data interval, and the DAG runs after the interval is complete.
Think of it like a newspaper. The “January 15th edition” is not printed on January 15th at midnight. It is printed after all the news from January 15th has been collected — essentially at the end of that day. The execution date is the date the newspaper covers, not the date it is printed.
Schedule: @daily
Execution Date: 2026-01-15 00:00:00
Actually runs at: 2026-01-16 00:00:00
Covers data for: January 15th (full day)
This design is intentional and practical. It ensures that all data for the interval exists before your pipeline tries to process it. If your pipeline processes “today’s sales data,” it should wait until the day is over before running — otherwise it would miss all the sales that happen in the afternoon and evening.
Defining Task Dependencies
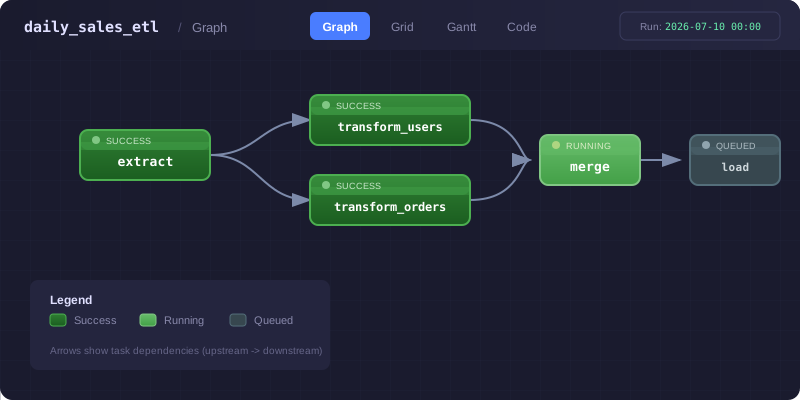
Dependencies are the “directed” part of “Directed Acyclic Graph.” They tell Airflow which tasks must finish before other tasks can start.
The >> and << Operators
The bitshift operators are the most common and readable way to define dependencies. The >> operator means “runs before” (or “triggers”), and << means “runs after” (or “depends on”).
Reading task_a >> task_b out loud as “task A flows into task B” or “task A triggers task B” helps build intuition.
You can chain them: task_a >> task_b >> task_c means A runs first, then B, then C. Each task waits for the previous one to succeed before starting.
You can also use lists to create fan-out and fan-in patterns, which we will cover in detail shortly.
# A runs before B
task_a >> task_b

# Chain: A then B then C
task_a >> task_b >> task_c

# Fan-out: A triggers both B and C in parallel
task_a >> [task_b, task_c]

# Fan-in: D waits for both B and C to complete
[task_b, task_c] >> task_d
Why Dependencies Matter
Without explicit dependencies, all tasks in a DAG would run simultaneously (if resources allow). This is rarely what you want. Your “transform” task needs the data that “extract” produces. Your “load” task needs the output of “transform.” Dependencies enforce this ordering.
But dependencies do more than just ordering — they also propagate failure. If “extract” fails, Airflow will not attempt “transform” or “load.” Their status will show as “upstream_failed,” meaning they were skipped because something they depend on did not succeed. This prevents your pipeline from processing stale or missing data.
Common Dependency Patterns
Real-world DAGs rarely follow a single straight line. They branch, merge, and sometimes take different paths based on conditions. Let us look at the most common patterns.
Linear Chain
The simplest pattern: tasks run one after another in a single line.
extract --> transform --> load --> validateThis is your basic ETL pipeline. Each step produces output that the next step consumes. You would use this when every step depends on exactly one predecessor.
extract >> transform >> load >> validateFan-Out (One to Many)
One task triggers multiple downstream tasks that run in parallel. This is one of Airflow’s biggest advantages over cron — parallel execution with dependency management.
Imagine you have extracted raw data and need to transform it in three different ways: cleaning user records, processing orders, and aggregating product data. These three transformations are independent of each other (they do not need each other’s output), so they can run simultaneously.
              +--> transform_users
extract ------+--> transform_orders
              +--> transform_products
The code is straightforward — you use a list on the right side of the >> operator:
extract >> [transform_users, transform_orders, transform_products]Fan-out is powerful because it reduces total pipeline time. If each transformation takes 10 minutes, running them in parallel takes 10 minutes total instead of 30.
Fan-In (Many to One)
The reverse of fan-out: multiple tasks must all complete before a single downstream task can start. This is common when you need to merge or aggregate results from parallel processing.
Continuing the example above, after all three transformations complete, you want to load everything into the warehouse in one batch:
transform_users    --+
transform_orders   --+--> load_warehouse
transform_products --+
[transform_users, transform_orders, transform_products] >> load_warehouseThe load_warehouse task will not start until all three transformations have succeeded. If any one of them fails, load_warehouse will not run (it will show “upstream_failed”).
Diamond Pattern (Fan-Out then Fan-In)
This combines fan-out and fan-in into the most common real-world pattern. One task fans out to multiple parallel tasks, and then they all fan back in to a single task.
              +--> transform_a --+
extract ------+--> transform_b --+--> load
              +--> transform_c --+
In code, you can express this concisely:
extract >> [transform_a, transform_b, transform_c] >> loadConditional Branching
Sometimes your pipeline needs to take different paths based on runtime conditions. For example, you might process data differently on weekdays versus weekends, or use a lightweight transformation for small datasets and a heavier one for large datasets.
The BranchPythonOperator lets you write a Python function that returns the task_id of the next task to run. All other branches are skipped.
An important detail about branching: the tasks on the non-selected branches get marked as “skipped,” not “failed.” This distinction matters for downstream merge points. If you have a task that needs to run after the branches converge, you need to set its trigger_rule to NONE_FAILED_MIN_ONE_SUCCESS instead of the default ALL_SUCCESS. Otherwise, the merge task will see the skipped branch as a non-success and will not run.
from airflow.operators.python import BranchPythonOperator
from airflow.operators.empty import EmptyOperator
from airflow.utils.trigger_rule import TriggerRule

def choose_path(**kwargs):
    record_count = kwargs["ti"].xcom_pull(task_ids="extract", key="count")
    if record_count > 100000:
        return "heavy_transform"
    return "light_transform"

branch = BranchPythonOperator(task_id="choose_path", python_callable=choose_path)
light = PythonOperator(task_id="light_transform", python_callable=transform_light)
heavy = PythonOperator(task_id="heavy_transform", python_callable=transform_heavy)
merge = EmptyOperator(
    task_id="merge",
    trigger_rule=TriggerRule.NONE_FAILED_MIN_ONE_SUCCESS,
)

branch >> [light, heavy] >> merge
Task Lifecycle States
Every task instance in Airflow moves through a defined set of states. Understanding these states helps you diagnose problems when things go wrong. When you look at the Airflow UI and see colored boxes, each color represents one of these states.
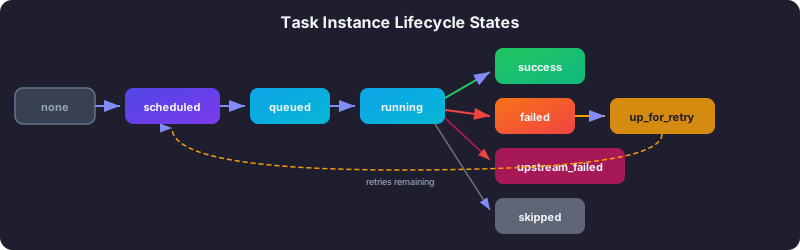
Here is the journey a healthy task takes:
none — The task exists in the DAG definition, but its dependencies have not been met yet. Think of it as a worker who has been assigned a job but is waiting for the assembly line to reach them.
scheduled — The Scheduler has checked the dependencies and confirmed they are all met. The task is ready to run. It is like the factory manager putting a work order on the queue.
queued — The task has been sent to the Executor, which has placed it in its queue. It is waiting for a Worker slot to become available. In a busy Airflow instance, tasks might sit in “queued” for a while if all Worker slots are occupied.
running — A Worker has picked up the task and is actively executing your code. This is where your Python function runs, your bash command executes, or your SQL query fires.
success — The task completed without raising an exception. The return value (if any) is stored in XCom, and downstream tasks are now eligible to run.
When things go wrong, there are several alternative end states:
failed — The task raised an exception, returned a non-zero exit code, or exceeded its timeout. If retries are configured, the task moves to “up_for_retry” instead.
up_for_retry — The task failed, but it has retry attempts remaining. Airflow will wait for the configured retry_delay and then move the task back to “scheduled.” This cycle repeats until the task either succeeds or exhausts its retries, at which point it moves to “failed.”
upstream_failed — The task was never attempted because one of its upstream dependencies failed. This is not an error in the task itself — it is a cascade effect from an earlier failure. Fixing the upstream task and re-running it will cause this task to run as well.
skipped — The task was deliberately not run, usually because a BranchPythonOperator chose a different path. Skipped tasks are not failures — they represent a valid pipeline decision.
deferred — The task started running, then yielded control to the Triggerer to wait for an external event. This is the resource-efficient waiting mechanism introduced in Airflow 2.2.
Trigger Rules
By default, a task only runs when ALL of its upstream tasks have succeeded. This is the ALL_SUCCESS trigger rule. But there are situations where you need different behavior.
The most common example is error handling. You might want a “send_failure_alert” task that runs when any upstream task fails. With the default trigger rule, this alert task would only run when everything succeeds — exactly when you do not need it. Setting trigger_rule=TriggerRule.ONE_FAILED makes it run when at least one upstream task has failed.
Another common case is the merge point after branching. As discussed earlier, when a BranchPythonOperator skips one branch, the merge task downstream sees a “skipped” status, which is not “success.” Using NONE_FAILED_MIN_ONE_SUCCESS says “run as long as nothing failed and at least one upstream succeeded” — which correctly handles the skipped branch.
Here are the trigger rules you are most likely to use:
| Trigger Rule | Meaning |
|---|---|
ALL_SUCCESS | Run only if every upstream task succeeded (the default) |
ALL_DONE | Run after all upstreams finish, regardless of their status |
ONE_FAILED | Run if at least one upstream failed |
ONE_SUCCESS | Run if at least one upstream succeeded |
NONE_FAILED | Run if no upstream task has failed (allows skipped) |
NONE_FAILED_MIN_ONE_SUCCESS | Run if nothing failed and at least one succeeded |
DAG File Best Practices
Before wrapping up, here are the practices that separate smooth-running production DAGs from constant headaches:
Keep DAG files fast to parse. The Scheduler re-reads your DAG files every 30 seconds. If your DAG file imports a heavy library at the top level, or makes an API call during import, you are slowing down the Scheduler for every DAG in your system. Put heavy imports inside your task functions, not at the module level.
Use catchup=False by default. Accidentally creating hundreds of backfill runs is one of the most common beginner mistakes. It can overwhelm your Scheduler, flood external APIs, and consume all your Worker slots. Enable catchup only when you deliberately want historical processing.
Set max_active_runs=1 for non-idempotent pipelines. If your pipeline writes to a destination without handling duplicates, two simultaneous runs can produce incorrect data. Serializing runs with max_active_runs=1 prevents this.
Use meaningful task IDs. Names like extract_user_data and load_to_warehouse make the UI and logs readable. Names like task_1 and step_a tell you nothing when you are debugging at 2 AM.
Keep tasks atomic. Each task should do one thing. If a task both extracts and transforms data, and it fails during transformation, you have to re-extract the data when you retry. If they are separate tasks, retrying the transform does not repeat the extraction.
Do not store large data in XCom. XCom values are stored in the Metadata Database, which is not designed for large payloads. Pass file paths, S3 keys, or database table references through XCom — not the data itself.
Next Steps
Now that you understand DAG structure, scheduling, and dependencies, explore operators and the modern TaskFlow API:
- Airflow Operators Guide — Learn about PythonOperator, BashOperator, Sensors, and provider operators.
- The TaskFlow API — Write cleaner DAGs using Python decorators instead of operators.
Related articles
- Airflow Installing Apache Airflow: pip and Docker Compose Methods
Step-by-step guide to installing Apache Airflow using pip with constraints or Docker Compose, creating an admin user, and verifying your setup works correctly.
- Airflow What Is Apache Airflow? A Complete Introduction
Learn what Apache Airflow is, why Airbnb created it, how DAGs work, and when to use Airflow for orchestrating data pipelines, ETL workflows, and ML operations.
- Airflow Dynamic DAGs in Airflow: Patterns and Best Practices
Master dynamic DAG generation in Airflow using DAG factories, dynamic task mapping, YAML configs, expand/reduce, and avoid common pitfalls.
- Airflow Building Custom Operators in Apache Airflow
Learn to build custom Airflow operators from scratch with BaseOperator, hooks, templated fields, testing strategies, and packaging for reuse.